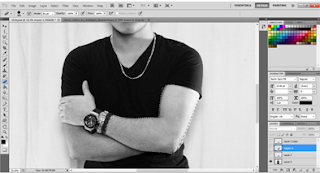
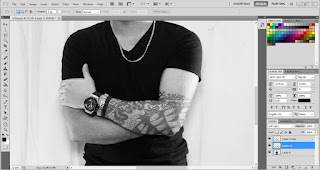
For my front cover I am first going to start off by adding the tattoo on to my models arm. This is because it will make the model and magazine have a much more R&B style. This is good as the audience will instantly be able to tell he is an R&B artists. Not only that I have chosen to add a tattoo because this feature is normally associated with R&B artists, as I have given an example in one of my previous posts. It also completes the image and links to the props) chain, watch and bracelets), costume and gesture. Io began creating the tattoo I first started with placing my main image. I done this my selecting the 'File' category, click on 'open' and then finding the file I want.
This is the image of the tattoo that I have chosen to add to my model. I have chosen this specific tattoo because it will be quick and easy to place on the arm, as his arm is the most area where his skin is showing.
I inserted this by doing exactly the steps as how I inserted the front image. Select, File and then choosing the document I want.
Now that I have all the images I need I can begin.
The second step was removing the background on the tattoo image. I did this really quickly. I started off by selecting the 'Erase tool' right clicking and pressing on 'background eras tool'. This enabled me to instantly remove the background by clicking once on white area. This worked easily because the tattoo did not have any ruff edges therefore it was very easy identify where the background is.
My third step was taking the tattoo and placing it on top of the models arm. So first I moved the image of the tattoo so both images are in the same place. I then had to swap the image around in order for me to be able to but it on the left arm, as it was originally for the right one. When completing this step I then moved on to adjusting the size to make sure it fits in the best possible way on his arm, I done this my clicking 'Ctrl T'.
Now I had to remove the tattoo image so I was able to see the arm clearly. I did this by removing the 'eye button' on the layer of the image. This means the image is still there, but can't be seen. In the meantime, I selected all the area that I wanted on the arm, using the 'Polygonal tool'.
The fifth step I did is pressing back on the 'eye button' on the layer of the tattoo image, so I was able to see the picture again. I then went on the 'Select' category and clicked on the 'Inverse button'. This will then do the opposite and select all the areas I don't need, making the process for me faster as I won't have to do it.
I then got the 'Eras tool' adjusted the size and hardness of the brush and rubbed off all the unwanted areas of the tattoo. I did not have to do this process slowly and zoom in like my double page spread image, because using the 'Inverse' button will enable me to only rub out the parts I did not selected, therefore I will only be rubbing out the parts I don't need. So for that reason, I won't ruin the image and it will be much faster.
This screen shot shows how it looks after I have finished rubbing out all the unwanted areas.
The next step was to select where I wanted the tattoo to get up to. As I did not want it to go all the way to the top because that will look to busy and won't be realistic. Therefore I had to use the 'Polygonal tool' to select the parts I want. I wanted all the arm and just above the Elbow. The red circle shows where I stopped.
When I finished selecting the area, I then pressed enter so I am left only with the parts I selected. I then went on 'Blending option' and selected the 'screen' button. This will make the tattoo look smoother and will blend into the models arm making it look like it was actually their.
This screen shot shows how it looks after pressing on the screen button the blending options category. I liked this a lot however, I felt as if it was to light so for that reason I duplicated the Image and putting them on top of each other which will make it look a little dark.
This is the final outcome. I am very pleased with it and I believe it looks very realistic.
Adding the second tattoo on the other arm
Step 1- I first began by using the 'T; tool which is the text to enable me to type the text I want.
Step 2- I started looking for I font. I wanted one which looked like handwriting this is because through my research I found that tattoo like this are normally in coll fonts. Therefore to make it as realistic as possible I decided to add this font.
Step 3- I Experimented with the size till i found the part one which looks best one his hand.
Step 4- To make the tattoo to look even more realistic I clicked on the arc text tool. This enables me to bend and curve the text the way I want. This will make it look more realistic as his hands are holed therefore the text can not be straight.
Step 5- At this stage the screen shot is showing how much am am curving int and how. As you can see I'm doing it through the adjustments box.
Step 6- I was tell adjusting it and moving it around till I found the correct placement for it.
Step 7- Shows the final outcome and how it looks after I have finished.
Removing the background of the image
Step 1- I first started off by using the 'polygonal too' to select all the areas I don't need.
Step 2- I when 'select' category and pressed on inverse. This will do the opposite of what I did. So it will swap the parts I selected with the other parts. This is much faster and easier for me as I won't have to take my time to selected the background as it's a large area.
Step 3- I the pressed deleted and all the background was removed. However there was still some small parts that I had to zoom in for and use the eraser to rub them off. I was also able to adjust the hardness and size of the brush as seen in the screen shot.
Step 4- Here I am showing how the image looks after I have finished manipulating it.


No comments:
Post a Comment